Exploring the strengths and weaknesses of today’s top monorepo solutions

Explore the complete series through the links below:
- Monorepo Insights: Nx, Turborepo, and PNPM (1/4)
- Monorepo Insights: Nx, Turborepo, and PNPM (2/4)
- Monorepo Insights: Nx, Turborepo, and PNPM (3/4)
- Monorepo Insights: Nx, Turborepo, and PNPM (4/4) (we are here)
Introduction
This article is part of a series in which we compare the features, performance, and suitability of Nx, PNPM, and Turborepo for our projects.
Having explored the inner workings and main features of both Nx and Turborepo, we now turn our attention to PNPM. Is PNPM’s workspace alone powerful enough to meet our needs and transform our development workflow?
As a reminder, our ultimate goal is to crown a monorepo champion — the tool that will streamline our development and enhance codebase management.
Let the battle continue! Here’s the challenge we’ll conquer together:
· PNPM under the microscope
∘ PNPM
∘ PNPM workspace
∘ PNPM graph
∘ PNPM vs NX vs Turbo
· Is PNPM’s Workspace Enough?
∘ PNPM Workspace + Vite + Vitest + ESLint : A Powerful combination?
∘ The Caching Question
· Technical verdict
∘ Our insights
∘ Real-World Insights: PNPM in the Wild
· Final Verdict: Our path for Monorepo Development
· Conclusion
Curious about what’s next? Come along and let’s discover it together! 🚀
PNPM under the microscope
PNPM
pnpm (Performant NPM) distinguishes itself from traditional package managers like npm and Yarn by taking a novel approach to speed, efficiency, and disk space usage.
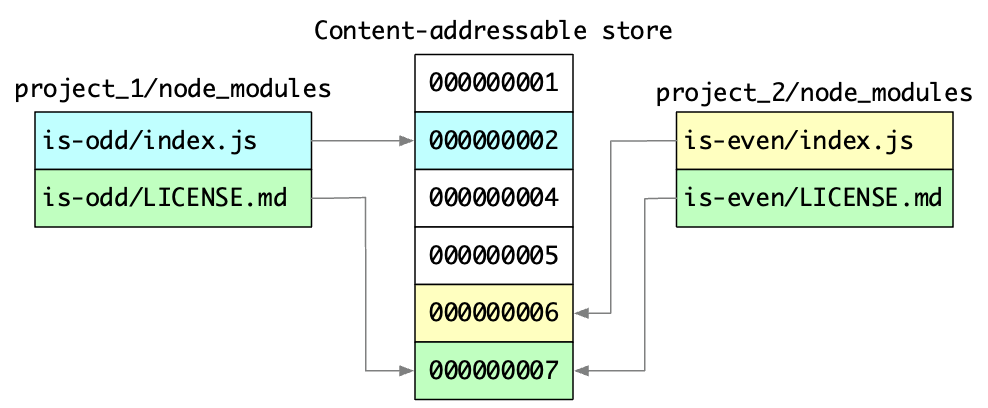
🔳 pnpm stores packages in a global content-addressable storage (CAS). To locate CAS directory you can execute pnpm store path .
If we visit the store (CAS), we will discover that all content is labeled with hash names:
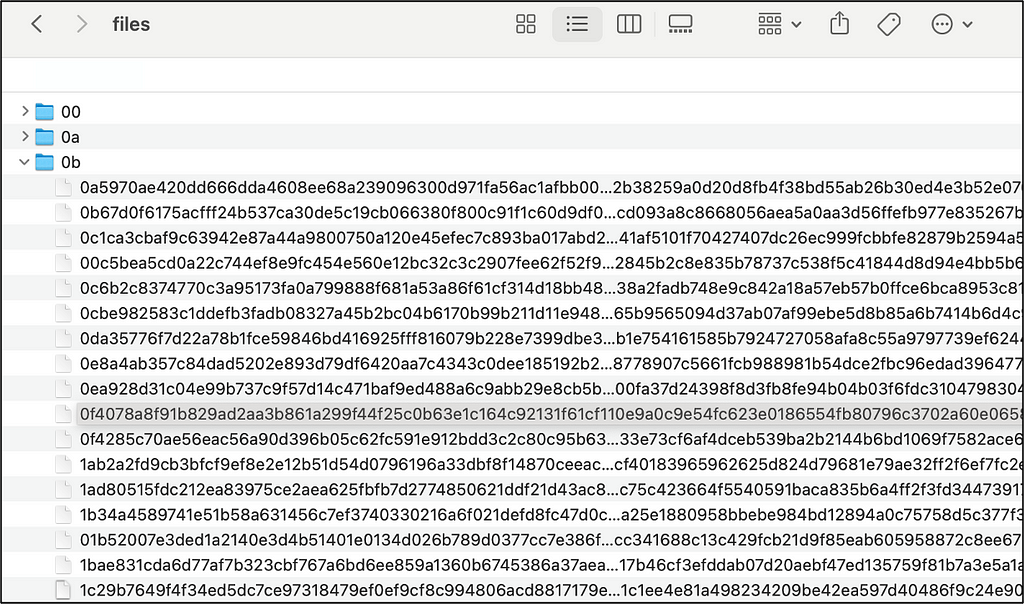
And if we open one of the hash files, we will reveal the real content of the dependency:

In pnpm, files are stored and retrieved based on their content, not their filenames. Each file is assigned a unique hash (similar to a Git commit hash) that serves as its identifier. This hash is generated based on the file’s content, so duplicate files will have the same hash.
Then, when installing a package, pnpm first checks if a file with the same hash already exists in its global store (CAS):
- If the file exists: pnpm simply creates a hard-link from the project’s node_modules/.pnpm folder to the existing file in the store (CAS).
- If the file doesn’t exist: pnpm downloads the file, stores it in the CAS, and then creates the hard-link.
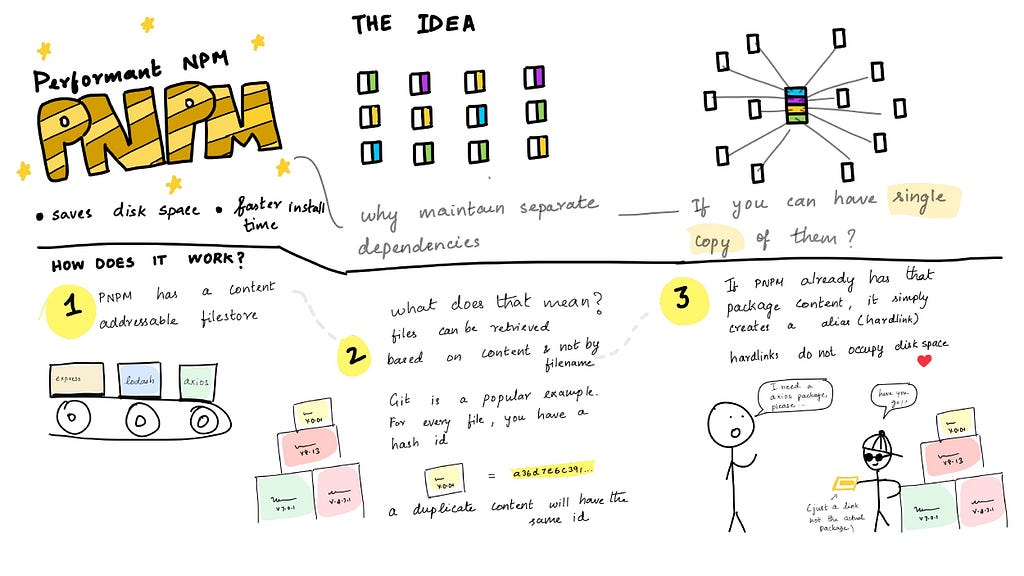
🔵 Each version of a dependency is physically stored in the store folder (CAS) only once, which providing a single source of truth and saving a significant amount of disk space.
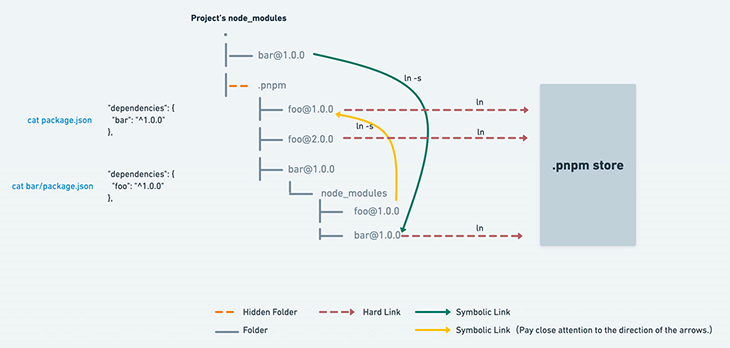
🔳 Hard-links share the same inode (a unique identifier for a file) with the original file, meaning they point directly to the same data blocks on the disk.
For example, if we have a file named document.txt and a hard link called report.txt, both names will refer to the same and exact file content. Modifying either document.txt or report.txt will change the data for both.
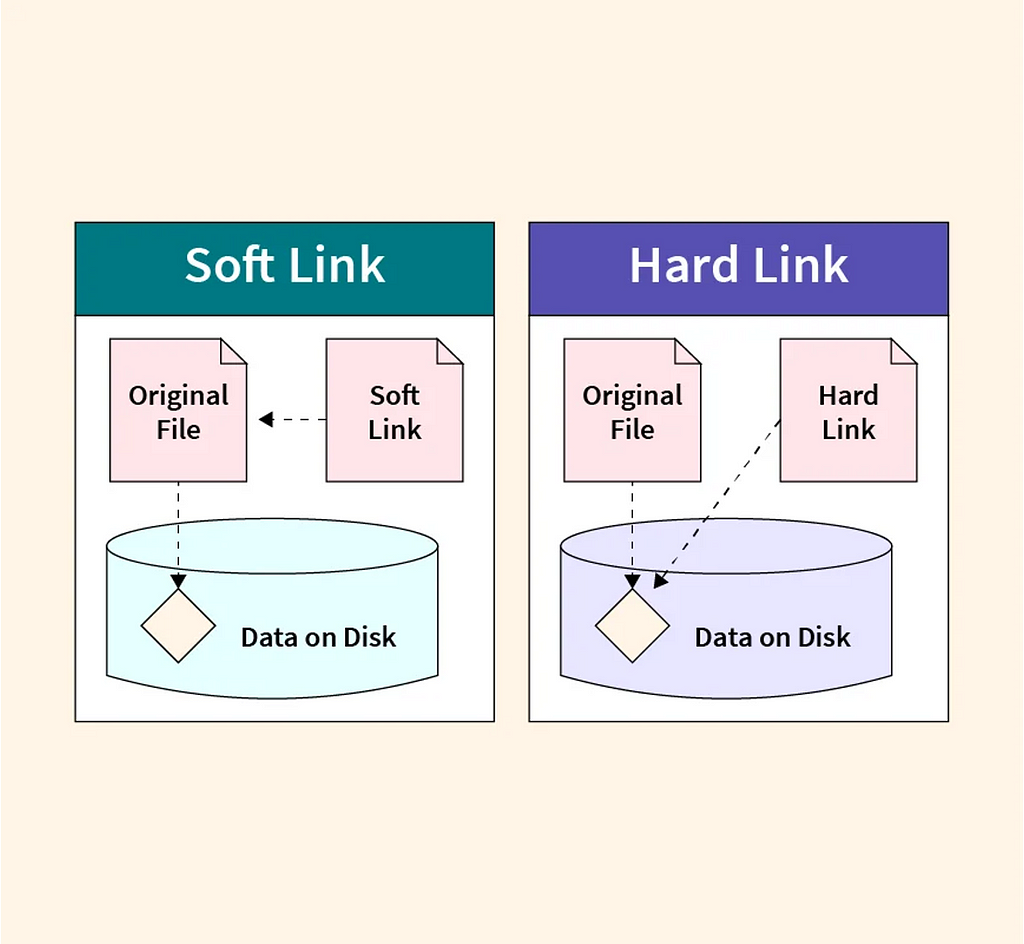
This hard linking strategy not only saves disk space but also dramatically speeds up installations and updates compared to package managers that copy files around.
🔳 Then, after hard-linking all the packages to node_modules/.pnpm (CAS -> node_modules/.pnpm), symbolic links are created to build the nested dependency graph structure:
node_modules
└── .pnpm
    ├── pretty-format@27.5.1
    │   └── node_modules
    │       └── react-is -> ../../react-is@17.0.2  // symlink
    ├── pretty-format@28.1.3
    │   └── node_modules
    │       └── react-is -> ../../react-is@18.3.1 // symlink
    ├── prop-types@15.8.1
    │   └── node_modules
    │       └── react-is -> ../../react-is@16.13.1 // symlink
    ├── rc-util@5.43.0_react-dom@18.2.0_react@18.2.0
    │   └── node_modules
    │       ├── react-is -> ../../react-is@18.3.1  // symlink
    │       ├── react-dom -> ../../react-dom@18.2.0 // symlink
    │       └── react -> ../../react@18.2.0 // symlink
    ├── react-is@16.13.1
    ├── react-is@17.0.2
    ├── react-is@18.3.1
    ├── react-dom@18.2.0
    └── react@18.2.0
Why bother with symbolic links? They’re essential for three key reasons:
✔️ Compatibility: Node.js and many tools expect dependencies to be nested within node_modules. Symlinks create the illusion of this nested structure while still leveraging are hard-linked for efficiency.
✔️ Flexibility: Symlinks allow pnpm to handle complex dependency scenarios where different packages might need different versions of the same dependency.
✔️ Efficiency: Symlinks create the necessary nested structure without duplicating files, keeping disk usage low.
🔳 When a package has peer dependencies, pnpm ensures that these dependencies are resolved from packages installed higher in the dependency graph. Let’s examine the following example:
node_modules
└── .pnpm
    ├── pretty-format@27.5.1
    │   └── node_modules
    │       └── react-is -> ../../react-is@17.0.2
    ├── pretty-format@28.1.3
    │   └── node_modules
    │       └── react-is -> ../../react-is@18.3.1
    ├── prop-types@15.8.1
    │   └── node_modules
    │       └── react-is -> ../../react-is@16.13.1
    ├── rc-util@5.43.0_react-dom@18.2.0_react@18.2.0
    │   └── node_modules
    │       ├── react-is -> ../../react-is@18.3.1
    │       ├── react-dom -> ../../react-dom@18.2.0
    │       └── react -> ../../react@18.2.0
    ├── react-is@16.13.1
    ├── react-is@17.0.2
    ├── react-is@18.3.1
    ├── react-dom@18.2.0
    └── react@18.2.0
pnpm creates symlinks that point to the correct version of the dependency instead of duplicating the installation, which saves time, bandwidth and disk space.
In a traditional node_modules setup (like npm or Yarn classic), if multiple packages depend on different versions of the same dependency, that dependency will be duplicated in the node_modules :
node_modules
├── pretty-format@27.5.1
│   └── node_modules
│       └── react-is@17.0.2
├── pretty-format@28.1.3
│   └── node_modules
│       └── react-is@18.3.1 (first one)
├── prop-types@15.8.1
│   └── node_modules
│       └── react-is@16.13.1
└── rc-util@5.43.0
    └── node_modules
        ├── react-is@18.3.1 (second one)
├── react-dom@18.2.0
        └── react@18.2.0
As you can see, react-is@18.3.1 is duplicated multiple times, taking up unnecessary disk space.
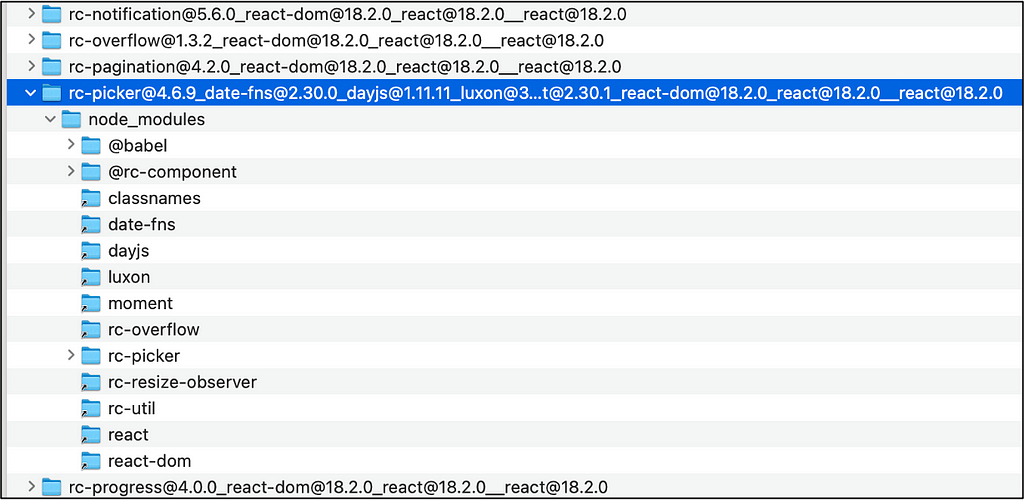
🔳 Inside the node_modules/.pnpm folder, each dependency folder name encodes details such as:
- Dependency name: e.g., rc-picker
- Dependency version: e.g., 4.6.9
- Peer dependencies: Names and versions of peer dependencies the package relies on, like rc-picker@4.6.9_date-fns@2.30.0_dayjs@1.11.11_luxon@3.4.4_moment@2.30.1_react-dom@18.2.0_react@18.2.0__react@18.2.0
...
// https://github.com/react-component/picker/blob/master/package.json#L85

"peerDependencies": {
  "date-fns": ">= 2.x",
      "dayjs": ">= 1.x",
      "luxon": ">= 3.x",
      "moment": ">= 2.x",
      "react": ">=16.9.0",
      "react-dom": ">=16.9.0"
},
"peerDependenciesMeta": {
  "date-fns": {
    "optional": true
  },
  "dayjs": {
    "optional": true
  },
  "luxon": {
    "optional": true
  },
  "moment": {
    "optional": true
  }
}
...
This careful organization helps pnpm ensure dependency compatibility and resolve potential conflicts.
🔳 This simplified schema summarizes how pnpm manages dependencies:
PNPM Dependency Management - Schema

Central Store (CAS)
│
├── package1@version1
│   ├── package.json
│   ├── index.js
│   └── ... (other files)
├── package2@version2
│   ├── package.json
│   └── ...
└── ... (other packages)

Project Structure (node_modules/.pnpm)
│
├── package1@version1 (Hard Link)
│   └── node_modules
│       ├── dependency1 -> ../../../dependency1@versionX (Symlink)
│       ├── dependency2 -> ../../../dependency2@versionY (Symlink)
│       └── ...
├── package2@version2 (Hard Link)
│   └── node_modules
│       └── ...
└── ...
- The main folders for each package within the .pnpm directory are hard linked from the global store (CAS).
- Inside the node_modules folder of each package, symlinks are used to point to the correct version of peer dependencies.
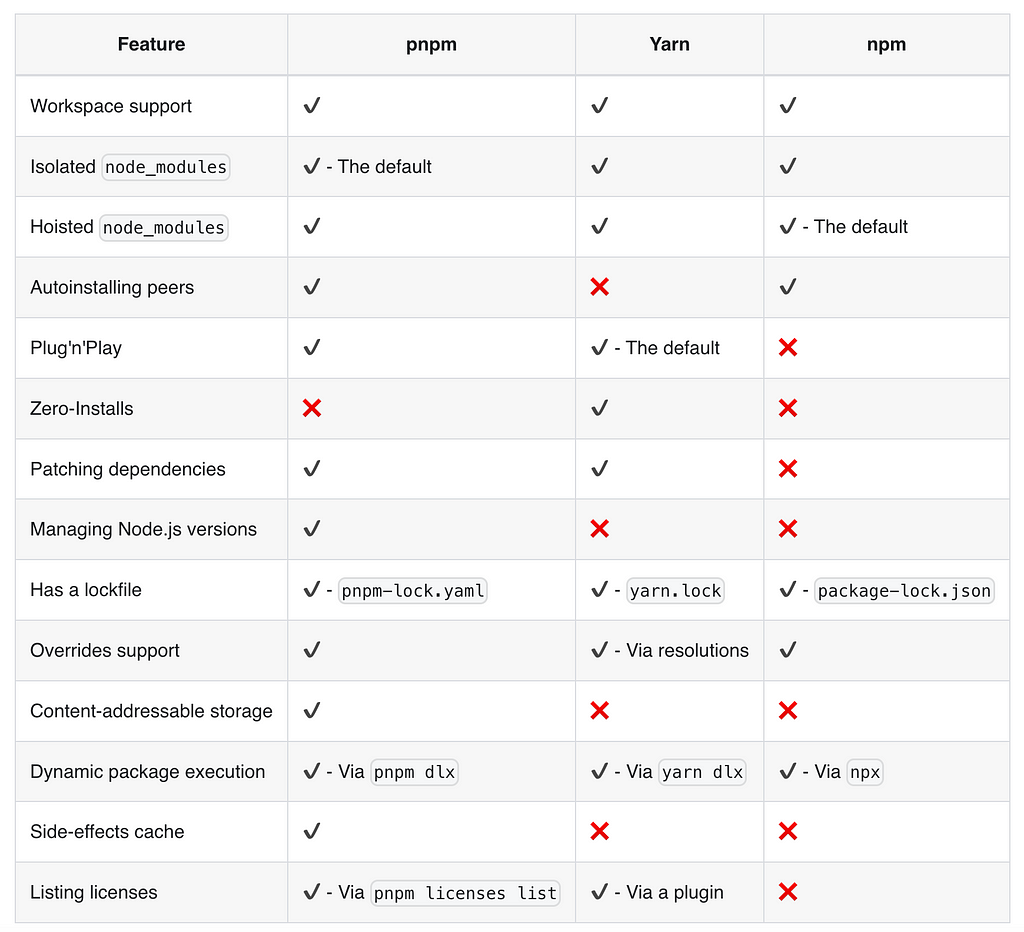
🔳 The following table compares the features of pnpm and its competitors:
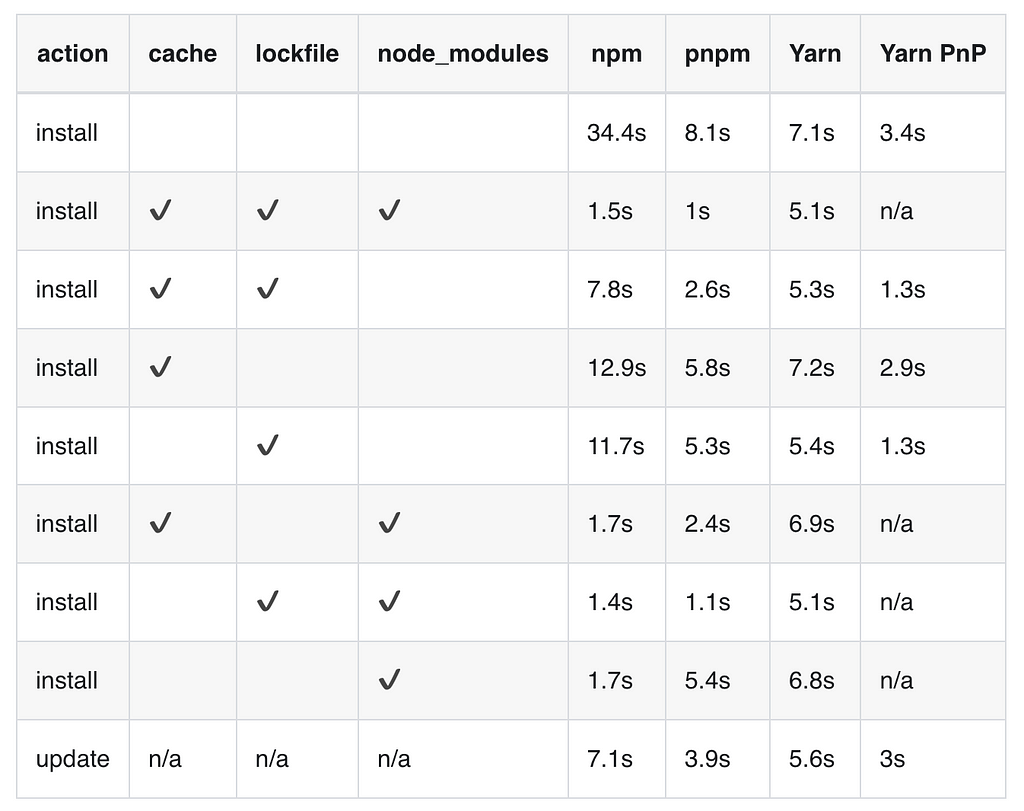
🔳 The benchmarks below display how pnpm ranks against its competitors in terms of time performance and in various situations:
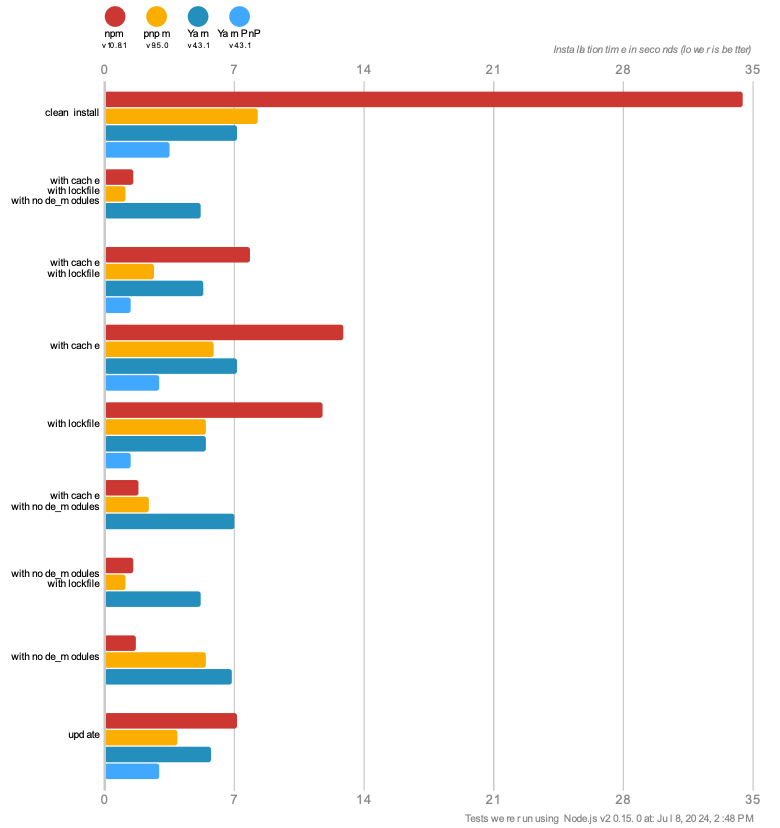
pnpm’s efficiency in managing a single project is well-established. But how does it scale when handling multiple interconnected projects? Let’s dive into pnpm workspaces and explore whether it manages multi-project dependencies with the same efficiency.
PNPM workspace
🔳 A workspace must have a pnpm-workspace.yaml file in its root.
Here’s an example of the content of a pnpm-workspace.yaml file:
packages:
  - 'packages/*'

catalog:
  '@babel/parser': ^7.24.7
  '@babel/types': ^7.24.7
  'estree-walker': ^2.0.2
  'magic-string': ^0.30.10
  'source-map-js': ^1.2.0
  'vite': ^5.3.3
Here you will find some real-world examples of workspace usage.
🔳 A workspace also may have an .npmrc in its root. Many configuration options for workspaces can be added to .npmrc file:
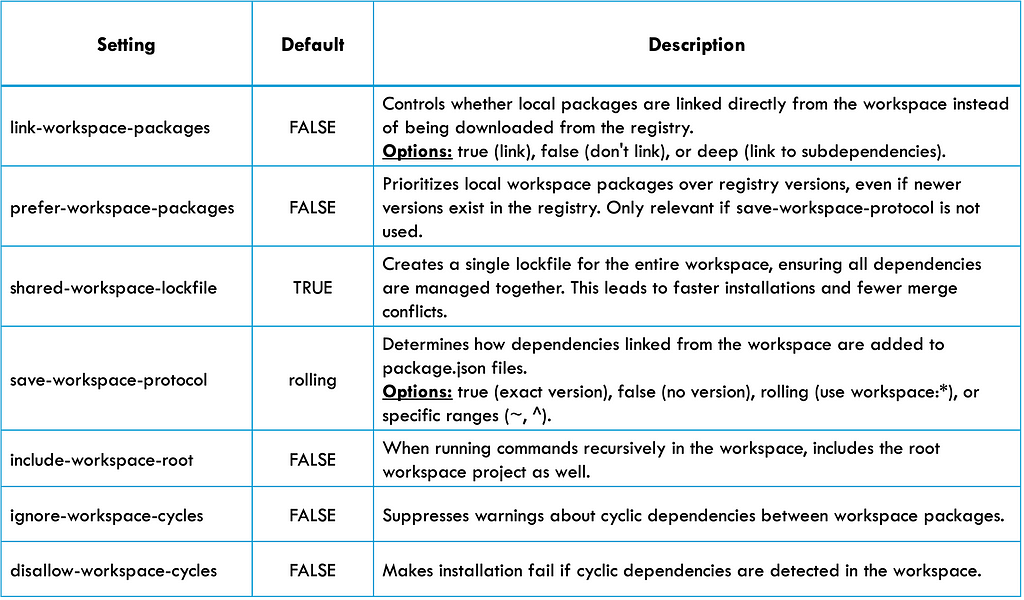
Here’s an example of the content of a .npmrc file:
# https://github.com/withastro/astro/blob/main/.npmrc
# Important! Never install `astro` even when new version is in registry
prefer-workspace-packages=true
link-workspace-packages=true
save-workspace-protocol=false # This prevents the examples to have the `workspace:` prefix
🔳 To reference packages within a pnpm workspace, we have two main options:
✔️ We can create aliases for workspace packages within their individual package.json files and then reference these aliases as dependencies in other packages’ package.json files.
Here is a real-life example from MUI: we define two transversal packages, mui/system and mui/types :
// https://github.com/mui/material-ui/blob/next/packages/mui-system/package.json#L2
{
  "name": "@mui/system",
  "version": "6.0.0-beta.1",
  "private": false,
  "author": "MUI Team",
...

// https://github.com/mui/material-ui/blob/next/packages/mui-types/package.json#L2
{
  "name": "@mui/types",
  "version": "7.2.14",
  "private": false,
  "author": "MUI Team",
These packages are then referenced as follows:
....
"dependencies": {
    "@mui/core-downloads-tracker": "workspace:^",
    "@mui/system": "workspace:*",
    "@mui/types": "workspace:^",
    "@mui/utils": "workspace:*",
...
  },
 "devDependencies": {
    "@mui/internal-babel-macros": "workspace:^",
    "@mui/internal-test-utils": "workspace:^",
...
We can also specify a particular version or range for the aliased dependency:
{
  "dependencies": {
     "foo": "workspace:*",
     "bar": "workspace:~",
     "qar": "workspace:^",
     "zoo": "workspace:^1.5.0" // specifying a particular version
  }
}
✔️ Relative Paths: It’s also possible to reference workspace packages using their relative path within the monorepo. For example, "foo": "workspace:../foo" would refer to the foo package located in a sibling directory relative to the package where we are declaring the dependency.
🔳 When we’re ready to publish a workspace package, pnpm automatically transforms the local workspace: dependency references into standard SemVer (Semantic Versioning) ranges. This ensures that the published package can be seamlessly consumed by other projects, even those not using pnpm.
For example, these dependencies:
{
  "dependencies": {
    "foo": "workspace:*",      // Any version of 'foo' from the workspace
    "bar": "workspace:~",     // ~1.5.0 (equivalent to 1.5.x)
    "qar": "workspace:^",     // ^1.5.0 (compatible with 1.x.x)
    "zoo": "workspace:^1.5.0" // Same as above
  }
}
Will be replaced with:
{
  "dependencies": {
    "foo": "1.5.0",      // Exact version
    "bar": "~1.5.0",
    "qar": "^1.5.0",
    "zoo": "^1.5.0"
  }
}
Now, anyone who installs the published package will get the correct versions of the dependencies, even if they don’t have the workspace setup.
🔴 pnpm workspaces don’t include built-in versioning (like lerna or npm), but they easily integrate with established tools like Changesets and Rush.
⚫ Cyclic dependencies in pnpm workspaces can lead to unpredictable script execution order. If such cycles are detected during installation, a warning will be issued by pnpm. The problematic packages may also be identified by pnpm. If this warning is encountered, the dependencies declared in dependencies, optionalDependencies, and devDependencies in the relevant package.json files should be inspected.
It is fortunate that we are talking about cyclical dependencies. Our next section will dive deep into pnpm: dependency graph, topological sort, and so on.
PNPM graph
🔳 pnpm uses the following internal libraries for graph management:
- graph-builder: This library is responsible for constructing the dependency graph from the pnpm-lock.yaml file.
- graph-sequencer: This library implements the topological sort algorithm to order the packages in the graph.
🔳 PNPM primarily uses the DAG to model dependency relationships between packages. This graph is constructed based on the dependencies, devDependencies, and optionalDependencies fields in pnpm-lock.yaml files (const currentPackages = currentLockfile?.packages ?? {}):
// https://github.com/ahaoboy/pnpm/blob/main/deps/graph-builder/src/lockfileToDepGraph.ts#L91C1-L108C1
export async function lockfileToDepGraph (
    lockfile: Lockfile,
    currentLockfile: Lockfile | null,
    opts: LockfileToDepGraphOptions
): Promise<LockfileToDepGraphResult> {
  const currentPackages = currentLockfile?.packages ?? {}
  const graph: DependenciesGraph = {}
  const directDependenciesByImporterId: DirectDependenciesByImporterId = {}
  if (lockfile.packages != null) {
    const pkgSnapshotByLocation: Record<string, PackageSnapshot> = {}
    await Promise.all(
        Object.entries(lockfile.packages).map(async ([depPath, pkgSnapshot]) => {
          if (opts.skipped.has(depPath)) return
          // TODO: optimize. This info can be already returned by pkgSnapshotToResolution()
          const { name: pkgName, version: pkgVersion } = nameVerFromPkgSnapshot(depPath, pkgSnapshot)
          const modules = path.join(opts.virtualStoreDir, dp.depPathToFilename(depPath), 'node_modules')
          const packageId = packageIdFromSnapshot(depPath, pkgSnapshot, opts.registries)

        ...
          const dir = path.join(modules, pkgName)
          const depIsPresent = !('directory' in pkgSnapshot.resolution && pkgSnapshot.resolution.directory != null) &&
              currentPackages[depPath] && equals(currentPackages[depPath].dependencies, lockfile.packages![depPath].dependencies)
          let dirExists: boolean | undefined
          if (
              depIsPresent && isEmpty(currentPackages[depPath].optionalDependencies ?? {}) &&
              isEmpty(lockfile.packages![depPath].optionalDependencies ?? {})
        ) {
            dirExists = await pathExists(dir)
            if (dirExists) {
              return
            }

            brokenModulesLogger.debug({
              missing: dir,
            })
          }
          let fetchResponse!: Partial<FetchResponse>
          if (depIsPresent && equals(currentPackages[depPath].optionalDependencies, lockfile.packages![depPath].optionalDependencies)) {
            if (dirExists ?? await pathExists(dir)) {
              fetchResponse = {}
            } else {
              brokenModulesLogger.debug({
                missing: dir,
              })
            }
          }
...
An example of pnpm-lock.yaml :
packages:

  '@adobe/css-tools@4.4.0':
    resolution: {integrity: sha512-Ff9+ksdQQB3rMncgqDK78uLznstjyfIf2Arnh22pW8kBpLs6rpKDwgnZT46hin5Hl1WzazzK64DOrhSwYpS7bQ==}

  '@ampproject/remapping@2.3.0':
    resolution: {integrity: sha512-30iZtAPgz+LTIYoeivqYo853f02jBYSd5uGnGpkFV0M3xOt9aN73erkgYAmZU43x4VfqcnLxW9Kpg3R5LC4YYw==}
    engines: {node: '>=6.0.0'}

  '@ant-design/colors@7.1.0':
    resolution: {integrity: sha512-MMoDGWn1y9LdQJQSHiCC20x3uZ3CwQnv9QMz6pCmJOrqdgM9YxsoVVY0wtrdXbmfSgnV0KNk6zi09NAhMR2jvg==}

  '@ant-design/cssinjs@1.21.0':
    resolution: {integrity: sha512-gIilraPl+9EoKdYxnupxjHB/Q6IHNRjEXszKbDxZdsgv4sAZ9pjkCq8yanDWNvyfjp4leir2OVAJm0vxwKK8YA==}
    peerDependencies:
      react: '>=16.0.0'
      react-dom: '>=16.0.0'


...
  '@jest/reporters@28.1.3':
    resolution: {integrity: sha512-JuAy7wkxQZVNU/V6g9xKzCGC5LVXx9FDcABKsSXp5MiKPEE2144a/vXTEDoyzjUpZKfVwp08Wqg5A4WfTMAzjg==}
    engines: {node: ^12.13.0 || ^14.15.0 || ^16.10.0 || >=17.0.0}
    peerDependencies:
      node-notifier: ^8.0.1 || ^9.0.0 || ^10.0.0
    peerDependenciesMeta:
      node-notifier:
        optional: true

  '@jest/reporters@29.7.0':
    resolution: {integrity: sha512-DApq0KJbJOEzAFYjHADNNxAE3KbhxQB1y5Kplb5Waqw6zVbuWatSnMjE5gs8FUgEPmNsnZA3NCWl9NG0ia04Pg==}
    engines: {node: ^14.15.0 || ^16.10.0 || >=18.0.0}
    peerDependencies:
      node-notifier: ^8.0.1 || ^9.0.0 || ^10.0.0
    peerDependenciesMeta:
      node-notifier:
        optional: true

...
    devDependencies:
      '@babel/core':
        specifier: '=7.18.6'
        version: 7.18.6
      '@babel/eslint-parser':
        specifier: '=7.24.6'
        version: 7.24.6(@babel/core@7.18.6)(eslint@9.0.0)
      '@babel/preset-env':
        specifier: '=7.23.6'
        version: 7.23.6(@babel/core@7.18.6)
      babel-jest:
        specifier: '=29.7.0'
        version: 29.7.0(@babel/core@7.18.6)
🔳 The findCycle function is a classic algorithm for detecting cycles in a directed graph. It uses a queue-based approach (Breadth-First Search – BFS) to traverse the graph starting from a given node (startNode). If it encounters the startNode again during traversal, it means a cycle exists:
// https://github.com/pnpm/pnpm/blob/main/deps/graph-sequencer/src/index.ts#L99
function findCycle (startNode: T): T[] {
  const queue: Array<[T, T[]]> = [[startNode, [startNode]]]
  const cycleVisited = new Set<T>()
  const cycles: T[][] = []

  while (queue.length) {
    const [id, cycle] = queue.shift()!
    for (const to of graph.get(id)!) {
      if (to === startNode) {
        cycleVisited.add(to)
        cycles.push([...cycle])
        continue
      }
      if (visited.has(to) || cycleVisited.has(to)) {
        continue
      }
      cycleVisited.add(to)
      queue.push([to, [...cycle, to]])
    }
  }

  if (!cycles.length) {
    return []
  }

  cycles.sort((a, b) => b.length - a.length)
  return cycles[0]
}

...
// https://github.com/pnpm/pnpm/blob/main/deps/graph-sequencer/src/index.ts#L66
const cycleNodes: T[] = []
for (const node of nodes) {
  const cycle = findCycle(node)
  if (cycle.length) {
    cycles.push(cycle)
    cycle.forEach(removeNode)
    cycleNodes.push(...cycle)

    if (cycle.length > 1) {
      safe = false
    }
  }
}
  chunks.push(cycleNodes)
}
🔳 Once the dependency graph is constructed, pnpm uses a topological sorting algorithm to determine the correct order in which to process packages. This ensures that a package’s dependencies are always handled before the package itself:
/**
 * Performs topological sorting on a graph while supporting node restrictions.
 *
 * @param {Graph<T>}  graph - The graph represented as a Map where keys are nodes and values are their outgoing edges.
 * @param {T[]} includedNodes - An array of nodes that should be included in the sorting process. Other nodes will be ignored.
 * @returns {Result<T>} An object containing the result of the sorting, including safe, chunks, and cycles.
 */
export function graphSequencer<T> (graph: Graph<T>, includedNodes: T[] = [...graph.keys()]): Result<T> {
  // Initialize reverseGraph with empty arrays for all nodes.
  const reverseGraph = new Map<T, T[]>()
  for (const key of graph.keys()) {
    reverseGraph.set(key, [])
  }

...
🔴 pnpm’s primary focus is on efficient dependency management, and it uses DAGs and topological sorting to ensure proper installation and resolution of package dependencies. However, when it comes to task execution (scripts defined in package.json), pnpm does not inherently impose a strict topological order or provide a caching mechanism like tools such as Nx or Turborepo.
✅ While pnpm doesn’t have a built-in task orchestration system like Nx or Turborepo, it does offer several commands and options to facilitate running tasks across multiple packages in a workspace:
Example: Parallel Build and Preview Scripts
"scripts": {
  "build": "pnpm  --parallel --filter "./**" build",
  "preview": "pnpm  --parallel --filter "./**" preview"
},
In this example, the build and preview scripts will be executed in parallel across all packages within the workspace.
PNPM vs NX vs Turbo
The following table provides a quick overview of the features that distinguish pnpm, Nx, and Turborepo:
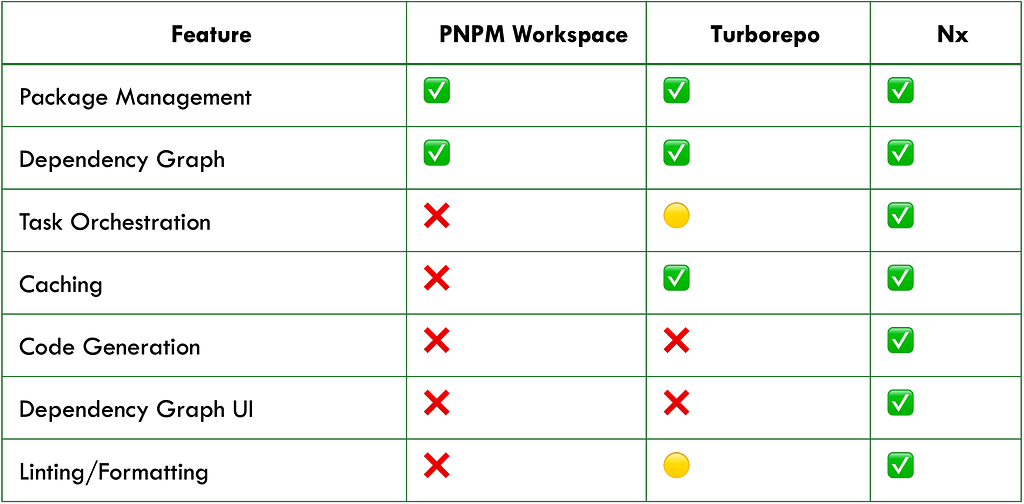
In a nutshell, we can say:
- Turborepo = PNPM Workspace + Build Optimization
- Nx = PNPM Workspace + Build Optimization + Task Orchestration + Additional Features
Based on these insights, you might be wondering, as I was, if combining pnpm workspace with performant tools like Vite, Vitest, and ESLint is enough for efficient monorepo development. Can we achieve a smooth developer experience (DX) without resorting to complex monorepo-specific tools like Nx or Turborepo? Let’s dive into this question in the next section.
Is PNPM’s Workspace Enough?
PNPM Workspace + Vite + Vitest + ESLint : A Powerful combination?
🔳 To understand the potential of this setup, it’s valuable to recall the core benefits monorepo tools like Nx and Turborepo offer:
- Speed: Optimized build and test execution through intelligent task orchestration and caching.
- Task Caching: Storing build artifacts to avoid redundant work in subsequent builds.
- Incremental Builds: Rebuilding only the parts of the codebase affected by changes.
- Ease of Use: Simplified setup and configuration for common monorepo tasks.
🔳 Now, let’s analyze the value proposition of the pnpm Workspace + Vite + Vitest + ESLint stack:
✔️ pnpm Workspace:
- Efficient Dependency Management: pnpm’s core strength lies in its efficient dependency resolution and storage using a content-addressable file system. This leads to faster installations, smaller disk footprint, and improved reliability.
- Workspace Features: While not as comprehensive as Nx or Turborepo, pnpm workspaces offer basic monorepo capabilities like shared dependencies, project linking, and easy script execution across packages.
✔️ Vite:
- Blazing Fast Development Server: Vite’s development server leverages native ES modules for near-instantaneous hot module reloading (HMR), boosting developer productivity.
- Optimized Production Builds: Vite’s production builds are powered by Rollup, a highly efficient bundler known for its performance.
- Versatile Features: Vite offers a rich set of features, including support for CSS preprocessors, module resolution, and integration with popular frameworks like React and Vue.js.
✔️ Vitest:
- Built-in Monorepo Support: Vitest, a testing framework designed for Vite, comes with native support for monorepos, simplifying test configuration and execution across packages.
- Fast and Efficient: Vitest leverages Vite’s caching and module resolution capabilities, resulting in fast test runs and a smooth developer experience.
✔️ ESLint with Caching:
- Enhanced Linting Performance: ESLint, the popular JavaScript linter, can be configured with caching to avoid re-analyzing unchanged files, speeding up the linting process.
- Monorepo-Wide Linting: With pnpm workspaces, we can easily share ESLint configurations and rules across the monorepo, ensuring consistent code quality.
🔳 Here’s a comparison table summarizing the key differences between the pnpm Workspace + Vite + Vitest + ESLint (with caching) combination, Nx, and Turborepo:
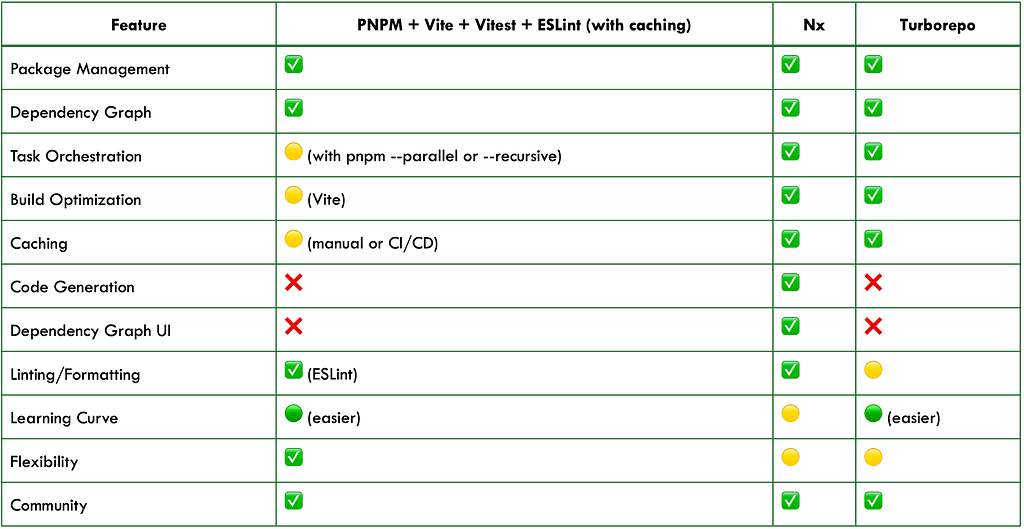
Key:
- ✅: Strong support or feature present.
- 🟡: Partial or limited support.
- 🟢: Easier to learn and use.
- 🟡: Moderate learning curve.
- ❌: Feature not present or requires significant custom configuration.
🔳 In light of the comparison table, a few pre-final thoughts:
- if we prefer a familiar stack with less overhead and prioritize the efficiency of individual packages, PNPM + Vite might be a good choice.
- if we need a comprehensive monorepo framework with a wide range of built-in features, Nx is a strong option.
- if build performance is our absolute top priority, Turborepo might still offer some advantages over PNPM + Vite, despite Vite’s speed and the potential for caching.
The results so far are promising, but we’re not done yet! Join me as we take a detour to unlock the full potential of PNPM + Vite by setting up a shared cache for both team development and continuous integration.
The Caching Question
In practice, local caching is often a non-issue with PNPM + Vite due to the built-in caching mechanisms of tools like Vite, Vitest, and ESLint. This makes the additional local caching offered by Nx or Turborepo potentially unnecessary. The real challenge for monorepo performance lies in optimizing CI builds, where PNPM’s unique structure demands strategic cache management.
A possible solution for CI builds cache is to use Docker.
🔳 The core idea is to use a shared Docker image that contains a base project setup (Node.js, PNPM, etc.) and update this image with the latest code from the repository during each CI build.
🔳 Here’s an example of a Docker image containing the base project setup:
FROM node:18

# Install pnpm globally
RUN npm install -g pnpm

# Set working directory
WORKDIR /app

# Copy project files
COPY package.json pnpm-workspace.yaml ./

# Install dependencies
RUN pnpm install

# Other setup (optional)
# (e.g., Install additional tools like Vitest, ESLint, etc.)
This image will be built and labeled with a name like my-project-base.
🔳 Here’s a simplified example of how we might structure our GitHub Actions workflow for Branch-Specific Builds:
name: CI Build

on: [push]
jobs:
  build:
    runs-on: ubuntu-latest
    steps:
      - uses: actions/checkout@v3
      - name: Set environment variables
        run: echo "BRANCH_NAME=$(echo ${GITHUB_REF#refs/heads/})" >> $GITHUB_ENV

      - name: Pull Docker image
        run: docker pull my-project:${{ env.BRANCH_NAME }} || true

      - name: Start container and update project
        run: |
          docker run -v $(pwd):/app my-project:${{ env.BRANCH_NAME }} sh -c "
            git fetch &&
            git checkout ${{ env.BRANCH_NAME }} &&
            pnpm install
            pnpm build
          "

      - name: Build and push Docker image
        run: |
          docker build -t my-project:${{ env.BRANCH_NAME }} .
          # (Optional: push the updated image to a registry)
- We pull the Docker image tagged with the specific branch name (my-project:${{ env.BRANCH_NAME }}). If it doesn't exist, it will fall back to the latest tag for example.
- The newly built image is tagged with the current branch name (my-project:${{ env.BRANCH_NAME }}) before potentially being pushed to the registry.
- This allows us to analyze and test changes on different branches independently.
🔳 Here’s a simplified example of how we might structure our GitHub Actions workflow for Parallel Pull Request Processing:
name: CI Build

on:
  pull_request:

jobs:
  build:
    runs-on: ubuntu-latest
    steps:
      - uses: actions/checkout@v3
      - name: Set environment variables
        run: echo "PR_NUMBER=${{ github.event.pull_request.number }}" >> $GITHUB_ENV

      - name: Pull Docker image
        run: docker pull my-project-base:latest || true

      - name: Start container and update project
        run: |
          docker run -v $(pwd):/app my-project-base sh -c "
            git fetch &&
            git checkout ${{ github.head_ref }} &&
            pnpm install
            pnpm build
          "

      - name: Build and push Docker image
        run: docker build -t my-project:pr-${{ env.PR_NUMBER }} .
        # (Optional: push the updated image to a registry)
- Each pull request can trigger a separate CI job that builds a Docker image tagged with the PR number (e.g., my-project:pr-123).
- Each PR’s build and tests run within its own isolated Docker container, ensuring that changes in one PR don’t affect the builds of others.
- These PR-specific builds can run in parallel, allowing us to test and review multiple PRs concurrently, accelerating our development cycle.
🔳 The main limitations of this solution are:
🔻 If multiple teams or projects use the same base image, changes made by one team can unintentionally invalidate the cache for others.
- The most straightforward solution is to create separate base images for each team or project (e.g., my-project-teamA-base, my-project-teamB-base).
🔻 Docker images can grow quite large, especially for monorepos with many dependencies. Pushing and pulling these images can take time and consume significant bandwidth.
- Possible solutions for this are to use Multi-stage Builds, review unused dependencies with pnpm prune, strategically order Dockerfile commands, combine commands, and use .dockerignore. Additionally, consider using lightweight options such as Alpine Linux or distroless images.
🔻 We’ll need to implement strategies for cache invalidation and cleanup to prevent stale caches from accumulating and taking up storage space.
- To solve this, one option is to create a scheduled CI job (e.g., weekly or nightly) that will automatically rebuild the base image even if there are no changes. This helps to periodically refresh the cache and incorporate any updates to the base image or underlying system packages.
✅ Some CI platforms offer built-in caching for specific tools (like Yarn or npm or pnpm). We could potentially leverage these in combination with Docker caching for further optimization:
- https://docs.github.com/en/actions/using-workflows/caching-dependencies-to-speed-up-workflows
- https://docs.gitlab.com/ee/ci/caching/
✅ One significant advantage of relying on manual caching strategies (like Docker or custom scripts) within a PNPM + Vite monorepo is that it allows us to avoid the potential costs associated with cloud-based caching solutions offered by Nx and Turborepo.
Having explored the nuances of pnpm workspace configurations and caching strategies, let’s dive into our technical assessment of pnpm’s effectiveness. We’ll then examine how it performs in the real world, drawing from case studies and practical examples. Here we go!
Technical verdict
Our insights
🔳 The Good: Where PNPM Shines
- Blazing Fast: Noticeably faster installations and dependency management compared to npm or Yarn.
- Space-Efficient: Saves significant disk space by storing dependencies only once and using hard links.
- Reliable: Strict dependency resolution ensures only declared dependencies are accessible, preventing errors.
- Workspace-Ready: Built-in workspace features facilitate managing multiple packages within a single repository.
🔳 The Not-So-Good: Areas for Improvement
- Learning Curve: Its unique approach might require some adjustment for those familiar with npm or Yarn.
- Limited Task Orchestration: Lacks built-in features for managing complex tasks across packages.
- Caching: Requires additional setup (like Docker or CI caching) to optimize build times in large monorepos.
To further validate our initial impressions, let’s explore how pnpm is being utilized in the broader development community.
Real-World Insights: PNPM in the Wild
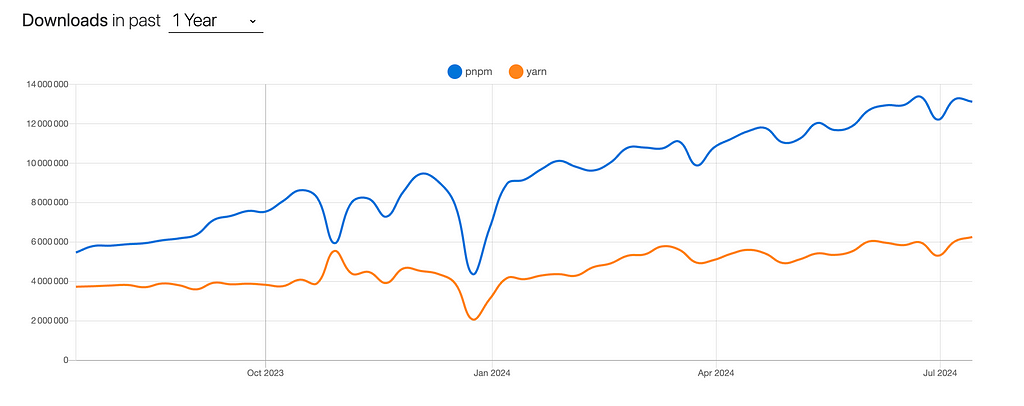
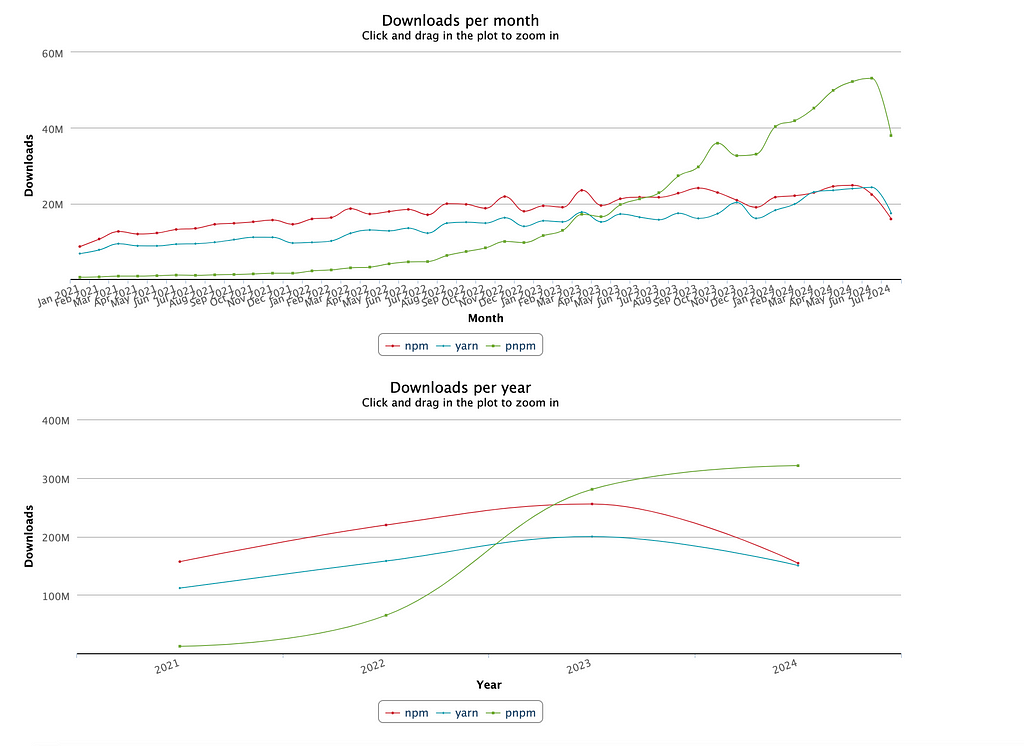
🔳 pnpm has been steadily growing in popularity over the past few years:


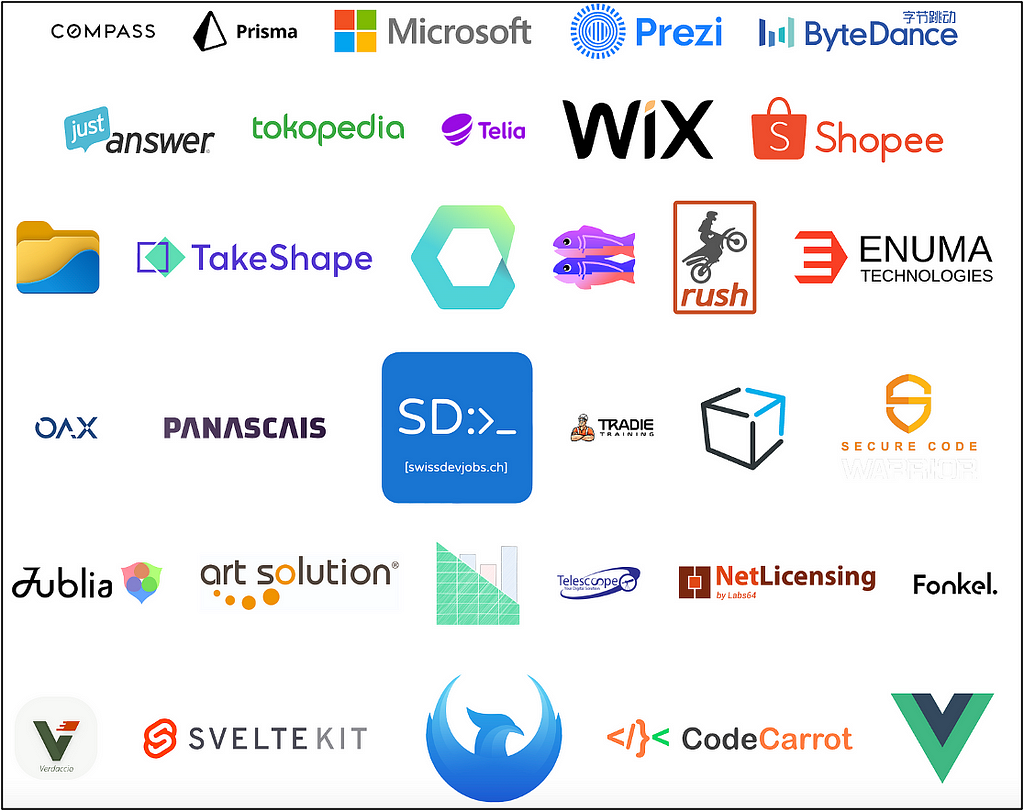
🔳 pnpm has seen widespread adoption across a diverse range of organizations, from tech giants like Microsoft to innovative startups like Prisma, and even influential open-source projects like Rush and SvelteKit:
🔳 A plethora of projects on GitHub use the pnpm.
🔳 A myriad of projects on GitHub use the pnpm workspace.
This real-world momentum underscores pnpm growing significance in the JavaScript ecosystem, affirming its position as a viable and compelling alternative to traditional package managers.
Now that we’ve explored the landscape, it’s time to choose our path. Will one tool reign supreme, or is a hybrid approach the optimal strategy for our monorepo? Let’s see!
Final Verdict: Our path for Monorepo Development
Here’s a table summarizing the key differences between PNPM workspace + Vite, Nx, and Turborepo to aid in our decision-making process:
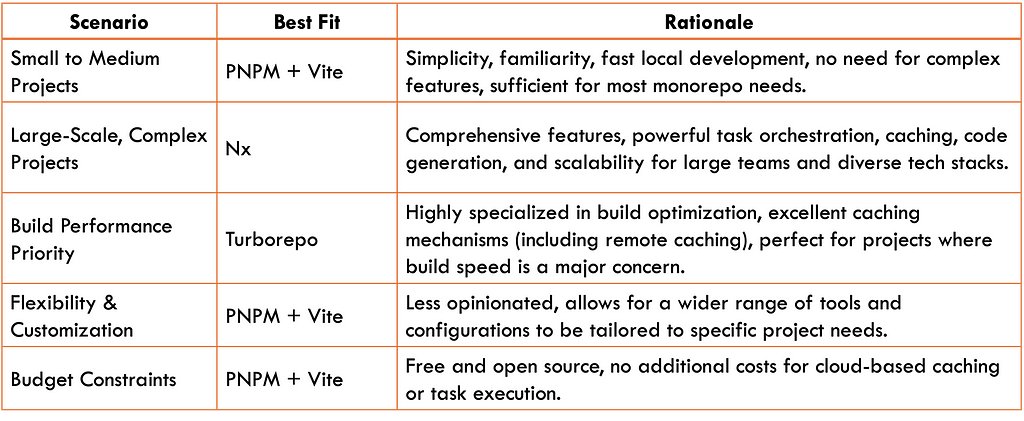
As our analysis reveals, the ideal monorepo tool depends heavily on the specific requirements of each project. However, since simplicity, flexibility, and performance are our top priorities — especially as we develop our own code generator, bistro — we can narrow down our options by excluding Nx.
While Nx is undeniably powerful, its extensive feature set might introduce unnecessary complexity for our current needs, potentially impacting performance. We prefer a solution that allows us to maintain full control over our tooling, easily integrate bistro into our workflow, and crucially, maintain high performance standards.
Therefore, we’ll establish a baseline with PNPM Workspace + Vite (and other essential tools), enjoying its flexibility and efficiency. If we find that build performance needs a boost, we can easily layer in Turborepo for its specialized optimization capabilities (Turborepo’s guide on adding it to an existing repository).
And that’s a wrap, folks, on our deep dive into the world of monorepo tools! We’ve explored the landscape, delved into the inner workings, and weighed the pros and cons. Now, it’s time to conclude! 🌟
Conclusion
In conclusion, our exploration of monorepo tools reveals that PNPM, Nx, and Turborepo each offer unique strengths depending on the project’s needs.
PNPM, with its emphasis on speed, efficiency, and simplicity, stands out as a versatile solution for many scenarios. However, Nx excels in managing complex, large-scale monorepos, while Turborepo prioritizes build optimization.
Given our focus on flexibility and maintaining control over our tooling, we’ve opted to establish PNPM Workspace + Vite as our foundation, confident in its ability to handle our current needs and integrate smoothly with our custom code generator, bistro. While Turborepo’s build optimization prowess is undeniable, we’ll keep it in our arsenal, ready to deploy if and when our project’s growth demands even greater performance gains.
Keep it simple and straightforward! Leonardo da Vinci stated that simplicity is the ultimate sophistication. ❤️
We hope this series has equipped you with the knowledge and insights needed to make an informed decision about the most suitable monorepo tool for your projects.
Remember, there’s no one-size-fits-all solution, and experimenting with different combinations can lead you to the perfect setup for your specific needs. Embrace the flexibility of monorepos, and happy coding! 🌟
Thank you for joining us on this monorepo adventure! 🚀
Until we meet again in a new article and a fresh adventure! ❤️
Thank you for reading my article.
Want to Connect?
You can find me at GitHub: https://github.com/helabenkhalfallah
Monorepo Insights: Nx, Turborepo, and PNPM (4/4) was originally published in ekino-france on Medium, where people are continuing the conversation by highlighting and responding to this story.

